Why Scraps of Grace you ask??? Primarily because it is through God's grace that I am able to do what I love...scrapbooking, cardmaking, basically anything that has beautiful paper and embellishments involved. This is also a place to share my work as well as whatever is on my heart. A creative outlet for the mind, body, and soul.

I encourage you to relax, read, and browse a while and I hope that your day will be brightened and blessed by what you encounter.

Tuesday, December 3, 2013

Trying to Catch Up

I have a few layouts and several cards that need sharing here on my blog but my days seem to be quite full lately.  I'm going to try to pop in here quickly and at least get some images up to share with you.
 
This layout highlights boy #2's first pair of glasses.  Everyone in our family except the youngest wears glasses so I figured it was only a matter of time before this one started wearing them...now if we could only figure out a way to keep from leaving them at school when we need them at home or leaving them at home when they're needed at school. 
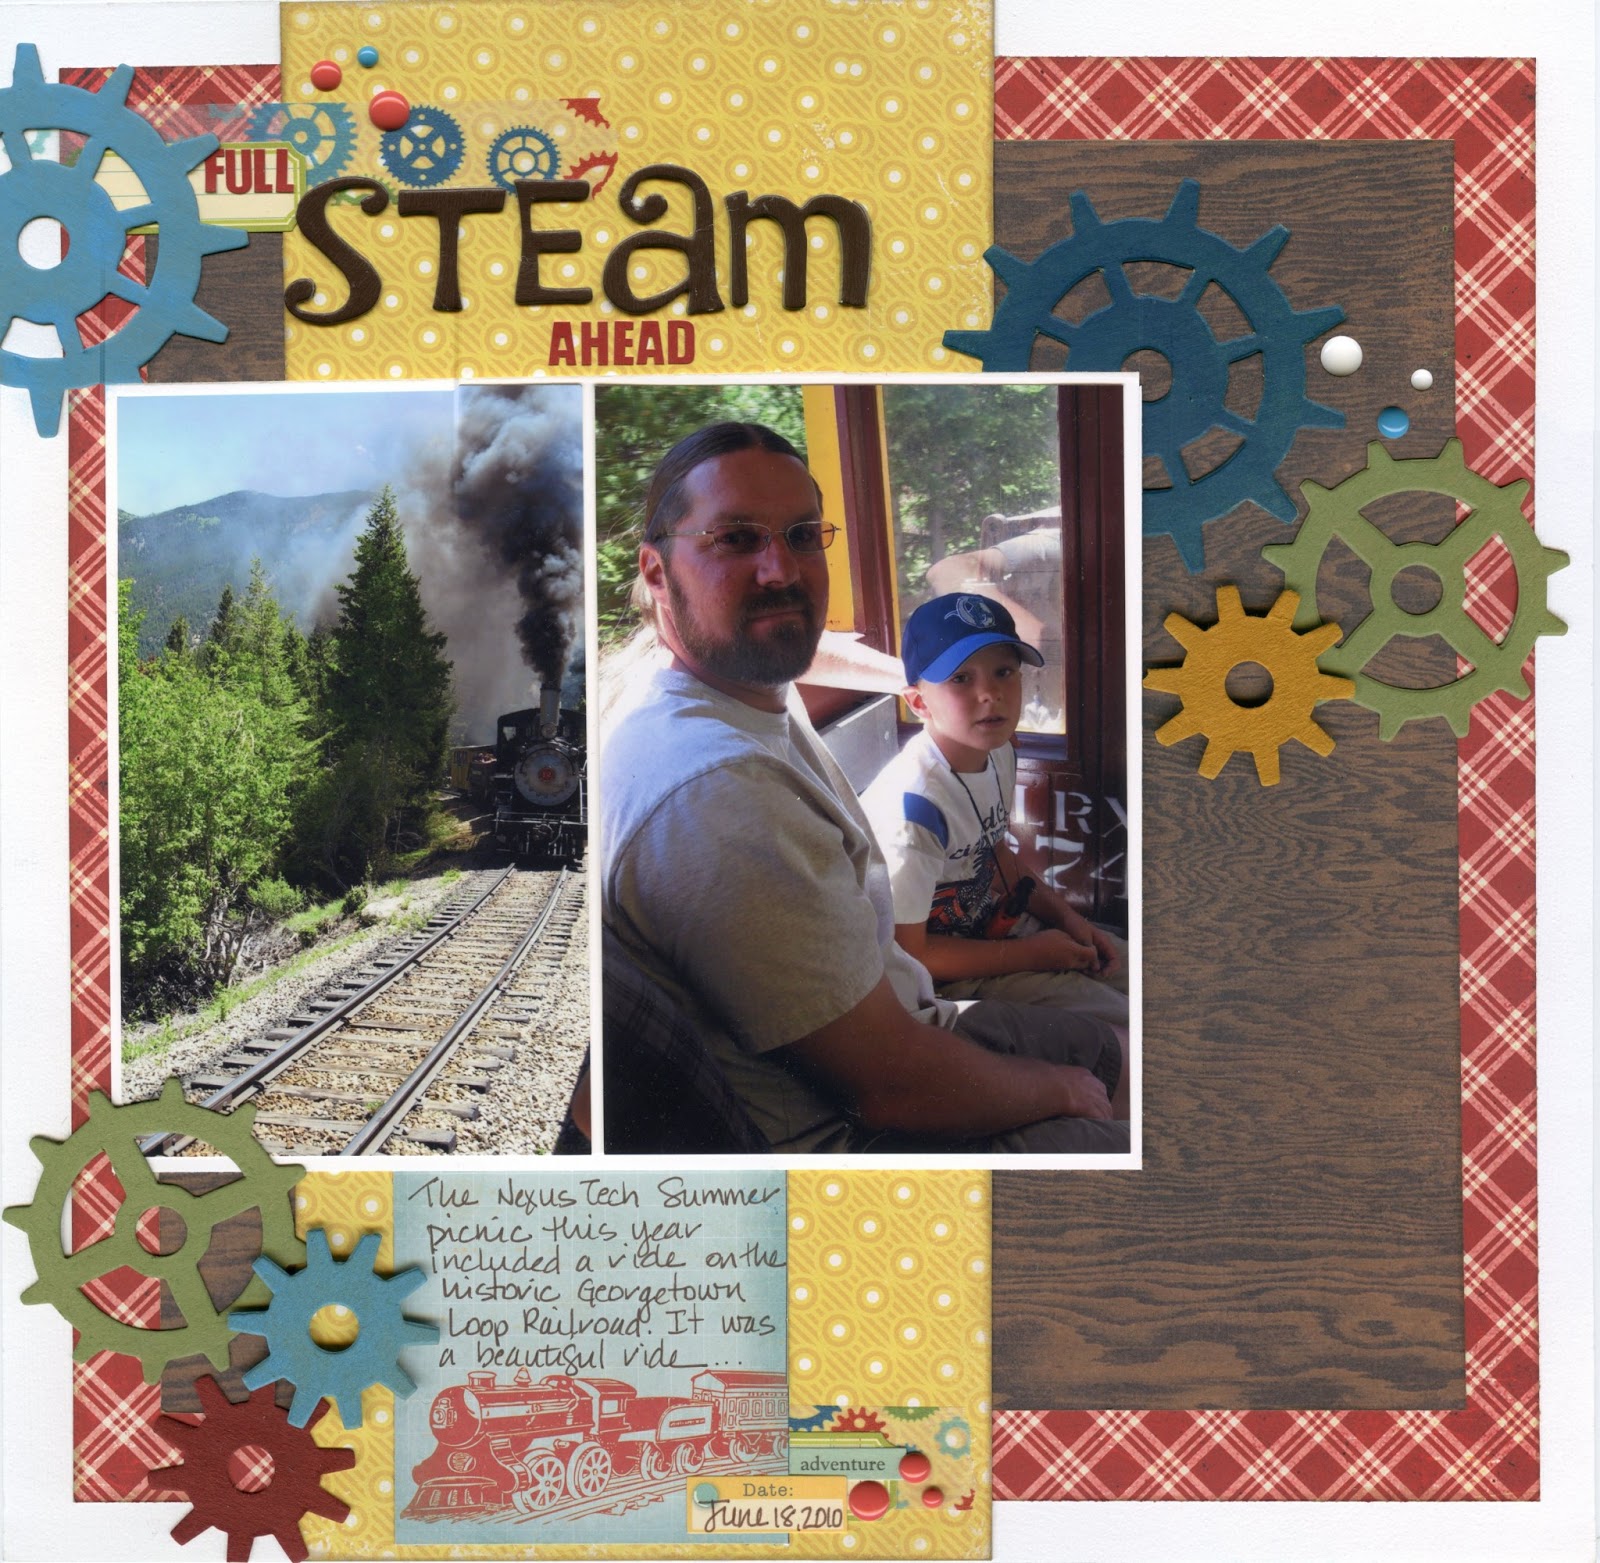
 
Supplies used:  Die cuts – Chic Tags, Elles Studio, Fancy Pants & craft supplies; Enamel dots – Doodlebug Designs Inc.; Ink – SEI Chalk Ink (Cocoa) & Smooch Spritz (Log Cabin); Letter stickers – Thickers (Jewelry Box); Paper Clips – Tim Holtz; Patterned Paper – Fancy Pants & We R Memory Keepers; Pen – ZigWriter (Chocolate); Stickers – Fancy Pants, October Afternoon & craft supplies
I mixed some old and new in on this one.  I outlined almost everything I added to the layout to help it pop off the darker blue background.  The big heart sticker said "a face only a mother could love" but I didn't like that sentiment for this layout so I placed some tiny alpha stickers over the "only" and replaced it with "this".  Now it reads "a face this mother could love".  This was a pretty quick layout and in retrospect I think I would have chosen a different title like A Sight for Sore Eyes...that's okay.  The photos and story behind them are documented and that is what is important.
 
Pin It!

Tuesday, November 26, 2013

It's Beginning to Look a Lot Like Christmas...

Not really...it's been bitter cold out here but very little snow so everything is crisp and brown in our corner of the world.  I'm ready for snow to cover it all up and be sparkly and white.  Meanwhile, I've been working on a few Christmas projects with many more to come (hopefully)
 
My husband's annual holiday party for his work is coming up soon and every year I make the place cards for the event.  I opted to use a new stamp set that I recently acquired from Lawn Fawn called Bows and Holly.  If you haven't tried Lawn Fawn's stamps, they are amazing.  I love them for coloring in.  The quality that they stamp is so crisp and clear leaving you with beautiful images to color in.  These are the finished place cards.
 

Supplies used: Cardstock - Neenah Solar White; Ink - Memento (Tuxedo Black); Pens - Copic (G24, YG61, YG 63, R22, R29, & R89), Sakura Gelly Roll (Clear Star)
 
I used Copic markers to color in the holly leaf and mistletoe stamps.  Once I had colored the images in, I took my Sakura Clear Star pen and added some glittery shine to the red berries for a bit of bling.  It's Christmas...you;ve got to have bling at Christmas!


Pin It!

Monday, November 25, 2013

Mapping it All Out

I have so much to share and yet I haven't been getting it up here on my blog.  I've been so busy taking care of business that the projects are piling up in my craft space.  I finally finished that big home decor project I had mentioned.  It's a map of the United States made with my Silhouette Cameo, patterned paper that I already had in my office, and some wood slats leftover from an old bed frame we no longer have in our house.  Wanna see???
 

Supplies used: Ink - ColorBox Chalk Ink (Charcoal); Patterned paper - Chatter Box, Crate Paper, Echo Park Paper Co., Graphic 45, My Minds Eye, October Afternoon and Simple Stories

The entire map was a Silhouette download that they offered as a weekly freebie quite some time ago.  I enlarged the map to fit the black foam core board I planned to use and then ungrouped the entire map.  I die cut each state and then inked around the edges using ColorBox Chalk Ink and a paint brush to get into all the little detail areas.  I wanted to ink up the edges so it would not only help to define the shape of each state but it would help each map piece blend into the black background where pieces didn't come together exactly.  Once the pieces were ready, I assembled the map using Mod Podge.  I finished the map off by adding a few coats of Mod Podge over the entire foam core board to protect it all.

For the base, my wonderful husband trimmed each plank to the size I needed and then secured them all together.  I stained the entire thing with a dark walnut stain that I roughed up a bit with sand paper once it was all dry.  I attached the foam core board to the wood planks using Beacon's Hold the Foam Glue for Styrofoam and my hubby hung it up.  I love how it turned out.  The finished size is roughly 35" x 25" including the plank base.  The colors match the colors in our family room perfectly and now that empty alcove above the fireplace has something to fill it in!
Pin It!

Tuesday, October 29, 2013

Halloween 2009

In honor of halloween this week, here is a layout of some photos from halloween 2009.
 
Supplies used: Alphabet chipboard – AC Thickers (Jewelry Box); Brads – Basic Grey; Cardstock – craft supplies; Ink – StazOn (Timber Brown); Patterned paper – BoBunny and Die Cuts With a View; Pen – ZigWriter (Chocolate); Rub-on Numbers – Doodlebug Design Inc.; Speech Bubble – Cosmo Cricket; Stickers – My Mind’s Eye; Washi tape – My Mind’s Eye
I really wanted to include all 3 photos from events leading up to Halloween which didn’t leave a whole lot of room for journaling on this single-page layout.  Using a simple list format for my journaling and rub-on numbers in both black and white from the same product line allowed me to fit it all in easily.  I kept the embellishments fairly simple by cutting a My Mind’s Eye label in half and tucking each half under the speech bubble to add a little more interest to the top corner and finishing each embellishment cluster off with matching brads from Basic Grey. 
Pin It!

Thursday, October 24, 2013

One of a Kind Costumes

It's almost Halloween so I figured I ought to scrap these really old photos of our younger boys trying on costumes that we had received from a friend of the family.  Her boys are adults now but back in the day when they were young, she took the time to make amazingly crafted costumes for them.  She passed them along to me when her boys had outgrown them and I have saved them all these years until our boys could wear them.  They've outgrown most of them now too but when these photos were taken, they could fit into most of them and they had so much fun trying them all on - mixing and matching them just for fun.  It was an evening full of giggles.
 
Supplies Used: Cardstock – Bazzill (swiss dot) & The Paper Co.; Enamel dots - My Mind’s Eye; Ink – ColorBox (Green) & StazOn (Timber Brown); Patterned paper – Echo Park Paper Co.; Pen – Zig Writer (Chocolate); Stamps – Studio AE by Technique Tuesday; Stickers – Echo Park Paper Co.; Tags – Jenni Bowlin & Michaels; Wood veneers – Studio Calico
This years costumes are partially ready.  Both boys are going to be "Steve" from Minecraft.  We have the heads and swords but I have to figure out what they are going to wear on the rest of their bodies...I wish I had more time to build them a square body to match the character.  Who knows, maybe I'll get some inspiration and get to crafting something before next Thursday.  
Pin It!

Thursday, October 17, 2013

Making our Home More Home-y

I've worked on several home decorating projects lately and have another big one in the works.  Just thought I'd share what I've been up to in making our home a little more comfy for us.
 
First up is this cross that I decorated for our master bedroom.  I used a quote from Bob Hazlett who was a guest speaker at our church a while back.  It says "Every problem we have is an invitation to learn who God is."  I love that... 
I covered a paper mache cross that I found at Hobby Lobby with acrylic paint then I decoupaged on the polka dot patterned paper.  Next I took the beautiful vintage lock from Blue Fern Studios, inked it up with brown ink then softened the edges with white ink, tied some twine around it and added an enamel dot.  The wood veneer hearts got a little ink around the edges and an enamel dot of their own then I glued them onto the cross.
 
Here are some detail shots...
 
 
Next up is a Fall decoration piece that hangs out in our family room.
This Fall subway art was a freebie download from the Internet.  I can't find my original source for this Silhouette file...sorry!  It is a print and cut file that I printed on our color printer then I used my Silhouette Cameo to cut out all the little details - the acorns, pumpkins and leaves.  I inked the edges of these little bits then glued them to the printed image.   I then mounted the finished image onto patterned paper and popped it into an 8x10 frame I found at Michael's.  I love how it turned out the warm, rich colors make me want to curl up in front of the fireplace.  I made a second one of these for a harvest themed auction basket for son #3's class.
 
This next project was for the Jingle Bells themed auction basket for son #2's class but I will be making another one to fill in the above frame when Christmas decorations come out in our house.
This print and cut file I created myself in my Silhouette software using some existing files I had purchased.  I printed the image on our color printer and then cut the little details (holly leaves, trees, and poinsettia flowers) out of patterned paper and cardstock, inked the edges and glued them to the printed image.  Once again, I matted the finished image on patterned paper and popped it into an 8x10 frame. 
 
The big project I'm working on is a map of the United States for a blank wall in our family room.  I have all the states cut out and I've inked all the edges, now I have to adhere it to a black foam core board and cover it with Mod Podge to protect it.  I think I'll use some wood planks I have in the garage to mount the foam core board on and then up it will go.  I promise to share pictures when it's completed.
 
I'm off for now...the boys and I have to figure out what they are going to dress up as for Halloween while they're home on their Fall break this week so I better get moving...the week is almost over!

Pin It!

Thursday, September 26, 2013

Silly Season...

I love how playful my husband is with our boys.  When I took these pictures, he thought nothing of it.  Boy #3 was being silly and hamming it up for the camera so why wouldn't my husband do it too?  Our boys are blessed that their Daddy has no problems being just a silly as they are, especially since Mom tends to be the more serious one of the bunch.
 
Supplies used: Alphabet stickers – Echo Park Paper Co.; Brads – My Mind’s Eye; Cardstock – Neenah (Desert Storm); Font – My Own Topher; Ink – ColorBox Fluid Chalk (Charcoal) & Jenni Bowlin (Cough Syrup); Patterned Paper – Echo Park Paper Co., My Mind’s Eye & Simple Stories; Tag – Chic Tags; Washi tape – My Mind’s Eye; Wood veneers – Studio Calico
I love the dimension that the My Mind's Eye patterned paper adds as the background - not quite black, not quite gray and certainly not boring.  I ran the Chic tag through my laser printer to add the journaling and cut apart one of the tag sheets from the Simple Stories 24/7 collection to help create the embellishment clusters.  The old fashioned cameras came from an Echo Park Paper Co. border strip. For the single camera, I simply fussy cut, inked the edges and put it on dimensional adhesive.

Pin It!

Thursday, September 19, 2013

Card Lovelies...

It seems we are in another season of celebrating around our household.  Lots of birthdays and some new babies getting ready to make their grand debut into this world as well as some folks getting ready to tie the knot.  All of this celebrating is cause for some creative card making.
 
First the birthdays...

I used the Simple Stories Say Cheese collection to create the card and gift tag. 
 Here's the card for the new wee one about to be welcomed to this amazing world.
I used Simple Stories Summer Fresh and Crate Paper Little Boy Blue collections along with my Silhouette to create this card.  The alphas are REALLY old Heidi Swapp and the brads are a combination of My Mind's Eye and Basic Grey.
Like I said, lots of celebrating.  There's a bridal shower and wedding on the horizon that I'll be making cards for as well but those are still in the works. 
 
Keep celebrating my crafty friends!
Pin It!

Tuesday, August 20, 2013

Group Camp

The kids are back to school and the house seems so quiet these days.  I still haven't settled into a routine and I've yet to scrapbook since they went back but I'll get there.  Here's a layout I finished up a couple weeks ago and haven't had the chance to share yet.  My husband went camping with a large group of friends and these are just a few of the shots he got while he was gone.
 
Supplies used: Alphabet stickers – Doodlebug Design Inc. (large brown) & My Mind’s Eye (small circles); Cardstock – American Crafts; Die cuts – Chic Tags, Echo Park Paper Co. & My Mind’s Eye; Enamel dots – Theresa Collins; Felt pieces – Little Yellow Bicycle; Journaling card – My Mind’s Eye; Patterned paper – My Mind’s Eye & Simple Stories; Pen – ZigWriter (Chocolate); Stickers – October Afternoon
I used a real mix of product - old and new on this one.  The blue felt circles are really old from Little Yellow Bicycle but they matched the blue in the Chic Tags "gone fishing" tag perfectly and gave the whole project a little pop. 
 
Today is "ladies' lunch" day and I can't wait.  I have a group of friends here in Colorado that I've known for a very long time and we get together once a month for lunch.  Our lunches take a back seat during the summer when all our kids are out of school but today - we resume ladies' lunch.  I'm so looking forward to girl time out relaxing with my friends!
Pin It!

Tuesday, August 6, 2013

Playing at the Field

I'm still working my way through the piles of photos that I have printed over the years and came across this one of our youngest and a family friend.  These boys are so much more grown up now but I love how little they are in this picture.  Innocently keeping busy while their big brothers had baseball practice.
 
Supplies used: Alpha stickers – Simple Stories; Buttons – craft supplies; Cardstock – American Crafts & Bazzill; Chipboard stickers – Heidi Grace by Fiskars; Die cuts – Elle’s Studio; Enamel dots – My Mind’s Eye; Patterned paper – Basic Grey, Echo Park Paper Co., GCD Studio & My Mind’s Eye; Pen – Pentel EnerGel; Stickers – Karen Foster Design & October Afternoon; Tag – Chic Tags; Title die cut – Silhouette (font Androgyne); Washi tape – Echo Park Paper Co.
 
The kids will all be back in school soon and I have great aspirations of working more diligently on my layouts.  There are so many new products coming out from the latest CHA releases and I can't wait to play with them but first I must use up some of my current supply which means I better get busy! 
 
For sure I will be purchasing the entire Say Cheese line from Simple Stories as soon as it hits the stores.  I love the color scheme and thankfully I do have some Disney photos to scrap - although I really don't think it's an exclusive Disney photo type line.  Do you have a favorite new product line that you absolutely have to have?
Pin It!

Tuesday, July 23, 2013

Birthday Wishes All Around

Lots and lots of birthdays to celebrate in our extended family and circle of friends these days.  Kids and adults alike!  I spent an afternoon creating cards to see us through a couple weeks of birthday goodness.


All of these cards have been mailed or hand delivered to their extra-special recipients and a whole new list of cards to be created has made its way to my craft desk. 
 
The younger boys have wrapped up their baseball seasons as well so there were small thank you tags to be made to hold gift cards for my husband's assistant coaches who are so instrumental to making it all work.
Super simple thanks to my Silhouette. 
 
We are on a short hiatus from organized sports but the littles do have swim lessons every morning for the next couple of weeks and then we're on to flag football.  Love all the activity in the summer - it keeps them busy and worn out so they sleep well at night.  Momma collapses at the end of the day too but that just means we have a fun and full day right?

Pin It!

Monday, July 8, 2013

For the Record...

I hope you all enjoyed the long holiday weekend (for those of you here in the U.S. celebrating our independence).  We celebrated with a BBQ at our friends' house.  Their county still allowed fireworks whereas there was a ban due to the high fire danger where we live.  We had so much fun laughing until our cheeks hurt, watching the fireworks and the dads help the boys launch water balloons down the block with the ultimate water balloon launcher.  So much fun!

We also dug into some home improvement projects over the long weekend.  We need to replace our deck and spent hours (I kid you not) at Lowe's choosing and ordering new Trex materials.  We tore the old deck apart - down to the rafters so it's now ready for a little bit of leveling and then we'll install the lovely new Trex decking and handrails.  I can't wait...it's going to be so pretty. 

I also took advantage of Shutterfly's coupon code and ordered a bunch of 4x6 prints to add to the enormous pile of photos I have waiting to be scrapped.  I'm almost current on photos to be printed - nowhere near current in getting said photos onto layouts but it will all happen eventually.  Today's layout is proof of how far behind I am since these photos are from 2009!

Supplies used:  Brads – Echo Park Paper Co.; Die cuts – Elle’s Studio, My Minds Eye & Jillibean Soup; Enamel dots – My Minds Eye; Ink – Distress Ink (Frayed Burlap); Patterned paper – GCD Studios, My Minds Eye & Simple Stories; Pen – Bic MarkIt; Stickers – Creative Imaginations & Echo Park Paper Co.; Thread – Clarks; Washi tape – Echo Park Paper Co.; Wood veneers – Studio Calico
 
I'm really having fun mixing and matching different manufacturers and old and new products together lately.  I don't want to let the oldies (but goodies) go to waste and end up in my donate pile but I want to keep my layouts current so mixing the two seems like the most logical choice.
 

Pin It!

Wednesday, June 26, 2013

Little Brother Big Brother

I'm digging through photos that I have printed and I just love this one of the two younger boys curled up in their PJ's, watching cartoons and (gasp) getting along!  Since we are 3 weeks into summer vacation, getting along isn't always happening these days so it was nice to reflect on a calmer moment.  In the case of our boys, too much time together is NEVER a good thing and since they play with mostly the same friends in the neighborhood, they are together most of the time right now. 

I am thankful for our church's VBS and daycamp program that is going on this week.  The older of the two boys is busy at church or other fun places with VBS and daycamp and the younger boy is in VBS for half the day and separated from his brother.  This is a good thing for them and for me.

I really mixed it up on this layout - lots of manufacturers and lots of older products as well.  I'm making a real effort to mix in some old with my newer stuff in order to keep it all somewhat current on my layouts.
Supplies used: Banner – Jenni Bowlin; Die cuts – Echo Park Paper Co., Fancy Pants & My Minds Eye; Envelope – Maya Road; Ink – Distress Ink (Frayed Burlap) & StazOn (Timber Brown); Journaling cards – Echo Park Paper Co. & Studio Calico; Patterned paper – Echo Park Paper Co. & Fancy Pants; Pen – Pentel EnerGel Alloy & ZigWriter; Stamps – StudioAE by Technique Tuesday; Stickers – Echo Park Paper Co., Fancy Pants, Karen Foster Design, My Minds Eye & October Afternoon; Tag – craft supplies; Title – EK Success
I do hope that you are all enjoying warm summer breezes and calm, relaxing days.
 

Pin It!

Wednesday, June 19, 2013

Honoring our fathers...

Today I thought I'd share the cards that I created to honor all the fathers in our lives.
 
This first card was the card I made for my husband.  The template for the card is one I downloaded from the Silhouette store.  I used mostly an older October Afternoon 8x8 paper pad to put this one together.
 
 
This card was designed with lots of input from boy #2.  The papers are once again October Afternoon along with the stickers.  The gears were cut from an Echo Park Paper file I purchased through the Silhouette store.
 

These last two were for my Dad and my husband's Dad.  Both were created using the My Minds Eye Miss Caroline Dilly Dally 6x6 pad.  The letter stickers are all from Echo Park Paper collections with the exception of the red glitter letters which are old Making Memories product.  The banner stickers are also from an older Echo Park Paper sticker sheet.  I used the gear cut file from Echo Park Paper along with my Silhouette again for the second card.

Pin It!

Tuesday, June 11, 2013

Good Times...

One of my girlfriends has been in my life for 13+ years.  We met through our husbands (they were our boyfriends back then), we have been at each others' weddings, we have helped one another out with newborns - she even watched two of our kids while I was in the hospital having #3.  We have helped one another through tough times and shared SO many good times.  She is a joyful person and has a way of bringing the fun with her wherever she goes.  Needless to say, I love being around her.  I tried to encompass her fun-loving spirit with all the little phrase stickers that I added to this layout.
 
Supplies used: Alphabet stickers – Thickers (Jewelry Box); Border – Sassafras; Ink – Distress Ink (Frayed Burlap); Patterned Paper – Echo Park Paper Co., My Minds Eye & October Afternoon; Stickers – American Crafts, Jillibean Soup, October Afternoon & Websters Pages
I used my circle punch and punched the round red shapes out of the October Afternoon paper that matches the red bandanna print border sticker from the Sasparilla collection.  Inking the edges and using dimensional adhesive to attach them to my page helps them to stand out as embellishments rather than just patterned paper.  The Sparkle sticker is an older American Crafts sticker that was actually a rectangle shape that didn't work on my page but I loved the phrase and felt that it described my friend perfectly so I simply cut it out and added it to my page.  I was able to stretch my supplies on this one (since I didn't have a ton in this color scheme) by using only part of the green, scallop border sticker at the bottom of the page and taking the left over scallops and adding them to each of the embellishment clusters in my visual triangle.  The polka-dot banners are simply patterned paper that has been cut and the edges inked.  I pulled the dark brown from the title into the embellishment clusters by using asterisks from the Thickers set.  Is pulls it all together with very few supplies.
 
 
Pin It!

Monday, June 3, 2013

Next to You...

Okay so my hubby and I have a TON of pictures using the same self-portrait pose.  Seriously...it really doesn't change much yet we continue to take this picture (all the time).  You'd think we'd teach one of the boys how to get a good shot of their parents.  Although, they aren't always with us when we do this.  We've gotten pretty good at self portraits but it made me laugh when I started going through a bunch of pictures and found all of these photos.
 
Supplies used: Alphabet stickers – Thickers (Heart); Brads – Basic Grey, Echo Park Paper Co., Making memories & My Minds Eye; Cardstock – The Paper Studio; Chipboard – Heidi Grace Designs by Fiskars; Die cuts – October Afternoon; Ink – Colorbox Fluid Chalk Ink (Charcoal); Journaling cards – Simple Stories; Patterned paper – Basic Grey; Pens – Signo Uniball (White) & Pentel EnerGel Alloy; Pins – K & Co.; Rub ons – Doodlebug Design Inc. (numbers) & Fancy Pants (circles); Stickers – Echo Park Paper Co.; Tags – Michaels & Silhouette Cameo; Woolies – Basic Grey
 
You'll have to excuse all my no make-up shots.  These pictures were all taken either out hiking or while we were on various camping trips so I'm less than glamorous.  I'm surrounded by all guys in my household so we do a lot of outside, getting dirty kind of activities...ain't nothing pretty about that but it sure is fun.


Pin It!

Friday, May 31, 2013

Spreading the News

For this layout I used a Facebook photo that was printed at Walgreen's some time ago.  I don't know if they still even offer this service but the comments on the Facebook picture post take care of the journaling for me and all I'm left to do is pull the layout together.  The photo quality is a little grainy because it is a picture pulled from Facebook but it's a fun look every once in a while.
 
Supplies used: Alphabet stickers – Echo Park Paper Co.; Brads – Echo Park Paper Co. and My Minds Eye; Ink – Distress Ink (Iced Spruce); Patterned Paper – Creative Imaginations and Scrap Within Reach; Pen – Bic MarkIt (Black); Stickers – Creative imaginations and Echo Park Paper Co.; Wood veneers – Studio Calico
The papers I used are really old - so old in fact that I've never even heard of Scrap Within Reach but that's what it said on the back of the papers.  I won those in a RAK a while back and have been hanging onto them (I have a hard time letting go).  They work well for this layout of our oldest.  I like the grungy, masculine feel they lend to the layout.  The embellishments are a real mix of supplies as well but it pulls together nicely I think.
 
Pin It!

Monday, May 20, 2013

Welcome to the Family

Monday again???  The weekends sure do fly by around here, especially now that the two younger boys have started their baseball seasons.  We had lovely weather though and the seeds are starting to sprout out in the vegetable garden so it's all good.
 
Here's a layout I'd love to share with you.  This young man was a big part of our family for the year that he lived with us.  He is now preparing to start a family of his own...we are so excited for him.
 
Supplies used: Alphabet stickers – Cosmo Cricket (chipboard), Echo Park Paper Co., and October Afternoon; Brads – Basic Grey and My Mind’s Eye; Cardstock – The Paper Co.; Journaling card – Glitz Designs; Patterned paper – My Mind’s Eye; Pen – Pentel Energel; Stickers – Echo Park Paper Co. and October Afternoon
This layout was inspired by Shimelle Laine using 6x6 paper pad blocking. 
 
Hope your day is off to an amazing start.  Be blessed!

Pin It!

Thursday, May 16, 2013

 
So I'm a little slow to get this updated with all that's been going on in our little world but you can follow my blog with Bloglovin by clicking on the link.
 
What have we been up to?  Oh a little of this...

and a little of this...

and lots of these...
 
My hubby and I were in Kauai for a 2nd honeymoon and had such a great time.  It's amazing how an entire week of just the two of us can refresh.  My amazing parents came out to watch the little boys for us.  They had a blast with their grandparents while we were gone and we knew they were in great hands so we could relax and not worry.
 
We've also started baseball season around here which means we're busy, busy, busy!  With hubby assistant coaching one team and head coaching the other, we're pretty much at the baseball fields all the time.
 
School is coming to a close for all the boys too.  The oldest is finishing up his first year of college (seriously...how did that happen?) and the younger two are finishing up another year of elementary school.  The weather has been lovely and I'm dreaming of days at the park and the pool.  Our garden has been planted so bring on the sun!
 
I'll have more crafty projects to share soon - until then...Aloha!
 
Pin It!

Monday, May 13, 2013

I hope you all had a lovely Mother's Day, either being celebrated as a mom or celebrating your own mom.  I know I did.  Our two youngest boys were baptized and that was an amazing gift...this sappy mom could not stop the tears from flowing!
 
Here's a recent layout I completed.
Supplies used:  Alphabet stickers – American Crafts Thickers (Jewelry Box) and Fancy Pants; Cardstock – Bazzill (Avalanche) and Neenah (Solar White); Die cuts – RAK fro Lisa Nazario-Gregory at http://what-a-beautiful-mess.blogspot.com/; Enamel dots – My Mind’s Eye and Teresa Collins; Ink – ColorBox Fluid Chalk (Ocean), ColorBox Pigment (Cyan), Distress Ink (Frayed Burlap), Jenni Bowlin (Cough Syrup & Lemon Drops) and VersaMagic (Tea Leaves); Journaling card – My Mind’s Eye; Patterned paper – Basic Grey, Crate Paper and Echo Park Paper Co.; Stickers – October Afternoon; Washi tape – Echo Park Paper Co.
The cute little cog die cuts were items I won in a RAK from Lisa Nazario-Gregory they arrived in my mailbox as plain kraft colored chipboard but they are super easily colored with any type of ink pad.  I love them so much and am sad that I've now used up all of the cute little cogs.  They match perfectly with the Echo Park washi tape.
 
The weather looks like it may finally be taking a turn towards Spring around here.  Highs are expected in the 80's today - yippee!  I hope Spring has sprung in your corner of the world and you are enjoying all the beauty it has to offer.
Pin It!

Tuesday, April 23, 2013

Lego Love

Boy #2 and boy #3 are slightly obsessed with Legos.  They love to build projects and then have their pictures taken with said project.  I particularly like these photos of boy #2 and his monster truck creation.  He was so proud of what he had done that I couldn't resist.


Supplies used: Alphas – Cosmo Cricket (Licorice); Ink – ColorBox Fluid Chalk Ink (Charcoal) and ColorBox Pigment Ink (Royal Blue); Journaling cards – Echo Park Paper Co. and Studio Calico; Patterned paper – Crate Paper, Echo Park Paper Co., October Afternoon and Sassafras; Stickers – Cosmo Cricket, Crate Paper, Jillibean Soup, My Mind’s Eye, October Afternoon and Sassafras; Wood veneers – Studio Calico
 
This layout is a real mix of some VERY old product (the Sassafras paper and banner stickers) as well as some brand new product (the Echo Park Scoot paper and stickers).  When I can pull products together like this I can justify why I don't get rid of stuff and my scrap supplies just seem to grow and grow (wink). Or maybe it's just that I can't resist all the pretty new stuff they come out with at each CHA.  Either way...it all inspires me to create.
 
Pin It!

Friday, April 19, 2013

Walk With Me Daddy

I love seeing my husband walking with our boys...especially when they reach up and grab a hold of his hand.  It reminds me of how dependant they still are on us and what a huge responsibility we have as their parents.

When boy #2 was born, I found this framed poem that I gave to my husband after our he was born.  I chose to use that poem for my journaling.  I just love, love, love the message it imparts.  A gentle reminder that we have much to do as parents to these wonderful boys.

Supplies used: Alpha stickers – Basic Grey and Lilly Bee Design; Border sticker – Crate Paper; Brads – Sassafras; Cardstock – The Paper Co.; Die cut – Silhouette Cameo; Font – My Own Topher; Frame – craft supplies; Ink – Distress Ink (Frayed Burlap & Antique Linen); Jute cord – Horizon Group; Journaling tag – Recollections; Patterned paper – Basic Grey, My Mind’s Eye, Pink Paislee and Simple Stories; Sprinklers – October Afternoon ( Buttermilk & Art Box); Stamps – Lawn Fawn and Studio AE by Technique Tuesday; Tag – Basic Grey and October Afternoon; Thread – carpet thread by American Thread Co.; Wood veneer – Studio Calico
I stamped directly onto the wood veneer banners using Studio AE stamp sets - the veneers were just too plain by themselves but I didn't want to fill them in with color.  I like the subtle affect it gives.  I used my distress inks to "age" most of the products on the page and like how it softens the edges.
 
 
Pin It!

Wednesday, April 10, 2013

We had a snow day yesterday - yes, you read that right, a snow day in April!  April is actually the 2nd snowiest month here in Colorado.  But the schools called the snow day the night before the storm actually hit and we didn't end up getting nearly the amount of snow they had predicted.  Only 3.5 inches or so compared to the 11.5 inches they had predicted.  In the district's defense, it was bitter cold (like it never got above 20 degrees cold - and that was at the warmest point in the day) Brrr! 
 
The kids were happy to stay inside where it was warm and cozy but we did have to venture out at one point for my hair appointment.  They were troopers and sat patiently where I got my hair done.  Once we were back home, they were busy firing Nerf guns all around the house and playing Minecraft which left me some time to play in my craft room.
 
Supplies used: Alpha stickers – The Paper Studio; Brads – My Mind’s Eye; Cardstock – Bazzill; Ink – October Afternoon sprinklers (Brown Bag) and Smooch Spritz (Emerald & Spun Sugar); Journaling card – My Mind’s Eye; Patterned paper – Simple Stories; Pen – ZigWriter (Chocolate); Stickers – October Afternoon; Tag – Converse clothing tag; Washi tape – My Mind’s Eye
The kids are off to school this morning despite the 2.5 degree temps on the thermometer.  I'm hoping my daffodils that are already blooming can survive until things warm up later this week.  Stay warm!
Pin It!

Thursday, April 4, 2013

4Ever Friend

Boy #2 has a friend that he's known since he was 2 1/2 years old.  His mom and I are also besties...works out quite nicely I'd say.  They are so funny and have such a good time when they are together and I wanted to make sure to capture that feeling on my layout so I chose pictures of them at their finest - adventuring up a tree and giggling at an ice cream parlor.  I love the masculine feel of this layout including the cool chipboard man.
 
Supplies used: Alphabets – Echo Park Paper Co. and Jillibean Soup; Chipboard – Maya Road; Distress Stickles – Ranger (Fired Brick); Ink – ColorBox Chalk Ink (Charcoal), StazOn (Jet Black) and Versafine (Onyx Black); Journaling Card – Crate Paper; Label sticker – Echo Park Paper Co. and Jenni Bowlin Studio; Patterned paper – Bazzill Basics, Echo Park Paper Co., Glitz Designs, Jillibean Soup and My Mind’s Eye; Pen – ZigWriter (Pure Black); Stamps – Hero Arts Clings, Lawn Fawn and Studio AE by Technique Tuesday; Stickers – Cosmo Cricket and Karen Foster Design; Tags – Crate Paper, Echo Park Paper Co. and Shabby Chic Crafts
 
I wanted to incorporate the chipboard man figure from a Maya Road mini album but it was too stark as plain chipboard.  I added the Hero Arts Watch Gears stamp and rotated the stamp so that one of the hearts was in the right location.  I then added the red Distress Stickles to that heart so it would stand out.  I also added “the blessing of” and “friends” stamps to the Shabby Chic tag to create a custom embellishment that matched the theme of my layout. 

Pin It!

Monday, April 1, 2013

Strike a Pose


This layout was inspired by this post and sketch by Shimelle over at Shimelle.com.  I didn't set out to make this layout when I pulled out my photos but I had read this blog post by Shimelle's earlier that day and it must have hit a chord because when I started to line up my page, this is exactly what happened.

Supplies used: Alpha stickers – Silhouette Cameo (Aria font) and Thickers (Rocketeer); Die cuts – Jillibean Soup and My Mind’s Eye; Eyelets – Making Memories; Ink – ColorBox Fluid Chalk Ink (Charcoal) and October Afternoon Sprinklers (Tin Type); Patterned paper – Crate Paper, Echo Park Paper Co. and My Mind’s Eye; Stickers – Echo Park Paper Co.; Tools – Making Memories eyelet setter and Tim Holtz Tiny Attacher; Twine – Divine Twine and Michael’s; Washi tape – My Mind’s Eye
 
I wasn't even sure I still had eyelets in my supplies anymore but lo and behold I not only had eyelets but I had eyelets in the color palette I had chosen!  It was meant to be I guess.  And can I tell you how much I love this yellow patterned paper by Crate??? Oh my goodness, it is the "B" side to one of their Valentine's papers that I originally bought to cut up and use the "A" side of.  Thinking I'll have to hunt down another sheet since I only bought the one. 


Pin It!

Friday, March 29, 2013

Happy Easter

Just wanted to hop on by and wish you all a Happy Easter.  I hope that your day is blessed as you remember the enormous sacrifice that was made in order that we may live eternally in Christ.  Be blessed today and always.
 
Supplies used: Alphabets – Echo Park Paper Co. and Thickers (Tinsel); Brads – My Mind’s Eye and Sassafras; Cardstock – Bazzill; Die cuts – October Afternoon; Ink – ColorBox Fluid Chalk (Charcoal); Patterned paper – Fancy Pants; Pen – Zig Writer (Pure Black); Rub-ons – Fancy Pants; Stickers – Fancy Pants; Transparency – Maya Road; Wood Veneer – Studio Calico

Pin It!

Wednesday, March 27, 2013

Shining Over at Jillibean Soup

Just wanted to share that Jillibean Soup is featuring one of my layouts on their blog today.  It is the Shine layout that I did of boy #2 and you can see it here.  Jenifer from Jillibean spotted it over in the Two Peas in a Bucket gallery and asked if she could share it on their blog.  Of course I said yes...I'm honored!
 
I love scrapping just for the art of it but am even happier when I can share it with others who understand and appreciate the heart that goes into every single layout.  Thanks for being here to share with...
 
 
Pin It!

Monday, March 25, 2013

100% Fun

Here's another layout with a real mix of products.  I used some of the new Echo Park Paper Co. About a Boy collection that I won from the wonderful Linda Auclair over at {bliss}.  So can I just say that I pretty much love everything that Echo Park comes out with.  Their collection packs are packed full of stuff and I can get so many layouts and cards out of one collection - it truly blows my mind!  Plus, one collection often matches quite well with their other collections so I can mix and match (which I love to do).  The "keep calm & enjoy summer" card was actually a freebie from Simple Stories from last Summer that I had printed onto white cardstock.

I outlined all my patterned papers with my ZigWriter pen to help ground them to the dark brown cardstock I used as my base.  I also trimmed a little label sticker in half and tucked it behind one of the cardboard owls and saved the other half to use on another project (who says scrapbookers can't be frugal???).  The "100%" epoxy numbers in the title have been hanging around my craft room FOREVER so I'm glad I was able to make them work on this layout.  Enjoy!


Supplies used: Cardstock – Bazzill Basics; Chipboard alphas – American Crafts Thickers (Nutmeg); Corrugated die cuts (owls) – Jillibean Soup; Epoxy Numbers (100%) – EK Success; Journaling card – Echo Park Paper Co.; Patterned paper – Echo Park Paper Co. and My Mind’s Eye; Pearls – Doodlebug Designs; Pen – ZigWriter (Chocolate); Stickers – My Mind’s Eye and October Afternoon; Subtitle card – Simple Stories; Vellum – Paper Adventures

Pin It!

Tuesday, March 19, 2013

Field Trip Fun

I'm still working my way through LOTS and LOTS of older photos that I've had printed and sitting in my craft area (for longer than I'd like to admit).  This layout is from a 1st grade field trip from boy #2.  There is a local ranch that reaches out to the local schools and helps to educate kids on everything from livestock to planting seeds.  They do such a great job and the kids have loved every single visit to Lowell Ranch.  I try to be one of the adult helpers when they go as I tend to learn something new each time as well.  This particular field trip, the kids learned about dairy farming and actually had the chance to make and taste butter.  So much fun to watch them shake cream in a baby food jar until it turns into solid butter - the excitement and resulting amazement is priceless.
 
Supplies used: Alphabet stickers – Doodlebug Designs and Echo Park Paper Co.; Brads – Basic Grey; cardstock – Neenah Solar White; Die cuts – Cosmo Cricket, Echo Park Paper Co. and October Afternoon; Ink – Distress Ink (Frayed Burlap) and StazOn (Timber Brown); Journaling card – Echo Park Paper Co.; Patterned paper – Basic Grey and Echo Park Paper Co.; Pen – ZigWriter (Chocolate); Stamp – Studio AE by Technique Tuesday; Stickers – My Mind’s Eye and October Afternoon; Tag – Prana clothing tag
I fussy cut around the water pump image from October Afternoon, inked around the edges and placed it on top of a journaling card from Echo Park Paper Co. to make it stand out.  It plays right along with the theme of visiting a working farm for my son’s field trip.  I also trimmed down a tag that I saved from a piece of clothing that had just the right amount of distressing to fit in with the layout so I tucked it under the corner of the photo on the left.  Can I tell you how much I love this blond wood grain from Basic Grey.  I was a little slow to jump on the wood grain band wagon but I sure do love how it looks.  Better late than never right???
Pin It!

Wednesday, March 13, 2013

Take a Hike

Wow...I guess our family really does spend a lot of our time outdoors!  I've been working my way through a bunch of pictures that I have had sitting in my work space and SO many of them are from hikes, or camping trips, or afternoons fishing.  Well, I guess in a family of all boys (except for me ) that's just what you do to keep the testosterone levels in check.
 
That said, here's my latest outdoorsy layout.
Supplies used: Alphabet stickers – Echo Park Paper Co.; Die cut – Scrap Your Story and Silhouette Cameo; Ink – Distress Ink (Frayed Burlap); Journaling card – My Mind’s Eye; Patterned paper – Bazzill, Echo Park Paper Co., Fancy Pants, My Mind’s Eye, October Afternoon and Theresa Collins; Pearls – Doodlebug Designs; Stickers – American Traditional Designs, Colorbok, Echo Park Paper Co. and Jillibean Soup; Washi tape – My Mind’s Eye; Wood veneer – Studio Calico
I am determined to get these older photos onto layouts along with using up some of my older supplies that I haven't been able to part with.  I mixed up some really old and some much newer product on this layout.  Stay tuned...there's more to come.

Pin It!

Tuesday, March 5, 2013

In Honor of Winter

In honor of winter and our recent trip to the mountains here is a layout...
 
Supplies used: Alphabet stickers - Echo Park Paper Co.; Enamel dots - Theresa Collins; Ink - Jenni Bowlin (Spice Tin), Studio G (Grey) and Versacolor (Celedon); Mistables - Studio Calico (snowflakes); Patterned paper - Echo Park Paper Co.; Pen - ZigWriter; Stickers - Echo Park Paper Co. and My Mind's Eye; Tag - Sorel clothing tag; Twine - Divine Twine
I used a lot of Echo Park Paper Co. mixing in the Scoot line (the background paper that looks like little snowflakes all over a navy background) and Wintertime (one of my all-time favorite lines).  I love how interchangeable the Echo Park papers are - one line often has some coordinating colors that will work well with another one of their paper lines.  Mix it up...just how I like it.

Pin It!

Tuesday, February 26, 2013

Number 3

Here's a recent layout I did.  I'm trying to work my way through a large quantity of older pictures and I just love these photos of our youngest.  We were playing around with settings on what was then our new camera and he's always eager to look adorable for the camera.
 
Supplies used:  Alphabet stickers - Echo Park Paper Co.; Enamel dots - My Minds Eye; Ink - Distress Ink (Frayed Burlap); Journaling card - Simple Stories; Patterned paper - My Minds Eye and Simple Stories; Stickers - October Afternoon and Simple Stories
 
Lots and lots of layers (seems to be my latest obsession) and I had fun using some of the word stickers as part of my journaling.  The background paper is a new one from the Collectables line from My Minds Eye that I bought intending to use the other side but loved how this angled wood plank looked.  Needless to say, I had to go back and buy several more sheets...after all, I have to use the other side on a layout too.
 
 
Pin It!

Sunday, February 24, 2013

Special Cards for Special Friends

So a couple of my besties have celebrated birthdays recently and I haven't shared their cards with you all yet.  Here's the first.
I relied heavily on my Silhouette Cameo for this one from the chevrons at the bottom of the card to the "celebrate today" sentiment on the card.  The flowers are some that have been in my collection for what seems like forever but the colors were a perfect match to this My Minds Eye patterned paper collection.
 
This next card was for the other birthday (which we celebrated as a group last night by way of the Further concert at the 1st Bank Center - such fun).
For this one I pulled together lots of bits and pieces as well as a new My Mind's Eye 6x6 paper pad I recently purchased.  I love all the dimension and texture.  The butterfly and crown piece is actually a tile from Prima from last year's CHA prize pack that I received from Two Peas in a Bucket that I didn't really know what to do with but it seems to fit on this card. 

Pin It!

Monday, February 18, 2013

Shine!

Today's layout is based on a sketch by Liz Chidester over at The Scrappiest.  I flipped the sketch and ran the circles vertically to work with the direction of my photo.  I used a whole lot of "older" supplies from my stash.  The white paper with the silver embossed stars has been in my collection for about 7 years now - I knew I'd use it eventually! 
 
The title tag was die cut using my Silhouette Cameo and then backed with some POW! glitter paper scraps leftover from the projects I made for the Daddy-Princess ball at our church.  Even though I have lots of new supplies in my craft room, I'm trying really hard to blend in the old with the new and use up what I have while still keeping my projects current with the addition of new items.
 
Supplies used: Brads – Making Memories; Cardstock – American Crafts; Die cuts – Jillibean Soup & Silhouette; Ink – ColorBox Chalk Ink (Chestnut Roan); Patterned paper – craft supplies, Crate Paper, Jillibean Soup & Little Yellow Bicycle; Pen – Bic MarkIt; Specialty Paper – POW by American Crafts; Sticker – Creative Imaginations; Twine – Craft Supplies; Wood Veneer – Studio Calico
 
I love this picture of our middle boy...we were playing with our new camera and he was being silly, wearing his big brother's hat and sporting a cute little grin.
Pin It!

Saturday, February 16, 2013

A Little More Love

Just sharing a little more of the love!  Here's the card I made for my hubby for Valentine's day.  The 3 cute little cards on the card were freebie downloads from Webster's Pages that I printed on our color printer.  I used a bunch more of them to leave him little love notes all throughout the house since I actually had to work that night.  The background for this card was die cut using my Silhouette Cameo out of kraft paper. 
 

Here are the "love notes" I left tucked throughout the house
 
And here's the card I made for each of our younger boys to find (along with a sweet treat) when they got home from school that day.
I think I have almost used up all of the patterned paper from the Echo Park Paper Co. Little Boy line.  I saved every little snippet of that paper and really used it.  Such a versatile paper line with it's bright, primary colors.
 
And lastly, a birthday card for one of my sister-in-laws that I don't think I shared yet.
This one used a couple of free downloads from Simple Stories from this past summer.
 
Have a wonderful long, holiday weekend!

Pin It!